작업 공간(Workspace)을 통한 격리
Terraform에서는 상태를 구분하여 저장할 수 있는 작업 공간을 제공합니다. 별도로 작업 공간을 설정하지 않았다면 기본적으로 default 작업 공간을 사용합니다.
terraform workspace 명령어를 사용하여 새로운 작업 공간을 생성하거나 전환할 수 있습니다.
Workspace 특징
- 다른 작업 공간을 생성하고
apply하면 기존 작업 공간과 동일한 인프라의 복사본을 배포합니다. - 다른 작업 공간으로 전환하는 것은 상태 파일이 저장된 경로만 변경합니다.
- 이미 배포되어 있는 인프라에 영향을 주지 않기 때문에 모듈을 테스트 할 때 유용합니다.
Workspace 동작 확인
코드 작성
1
2
3
4
5
6
7
8
9
10
11
12
13
14
15
16
17
18
19
20
21
22
23
24
25
26
27
28
29
30
31
32
33
34
35
36
37
38
39
40
mkdir tfstate-workspace && cd tfstate-workspace

# backend.tf
provider "aws" {
  region = "ap-northeast-2"
  profile = "ljyoon"
}

resource "aws_s3_bucket" "mys3bucket" {
  bucket = "jjikin-t101study-tfstate-week3"
}

# Enable versioning so you can see the full revision history of your state files
resource "aws_s3_bucket_versioning" "mys3bucket_versioning" {
  bucket = aws_s3_bucket.mys3bucket.id
  versioning_configuration {
    status = "Enabled"
  }
}

resource "aws_dynamodb_table" "mydynamodbtable" {
  name         = "terraform-locks-week3"
  billing_mode = "PAY_PER_REQUEST"
  hash_key     = "LockID"

  attribute {
    name = "LockID"
    type = "S"
  }
}

output "s3_bucket_arn" {
  value       = aws_s3_bucket.mys3bucket.arn
  description = "The ARN of the S3 bucket"
}

output "dynamodb_table_name" {
  value       = aws_dynamodb_table.mydynamodbtable.name
  description = "The name of the DynamoDB table"
}
배포 및 확인
1
2
3
4
5
6
7
8
9
10
11
12
13
14
15
16
17
terraform init && terraform plan
terraform apply -auto-approve

terraform state list
	aws_dynamodb_table.mydynamodbtable
	aws_s3_bucket.mys3bucket
	aws_s3_bucket_versioning.mys3bucket_versioning

aws s3 ls --profile ljyoon
	2022-11-05 20:10:59 jjikin-t101study-tfstate-week3
  ...
aws dynamodb list-tables --output text --profile ljyoon
	TABLENAMES      terraform-locks-week3

# 기존 작업 경로로 이동
cd .. && pwd
	.../t101-terraform/week3
기존 환경(default)에서 Instance 생성 및 배포
1
2
3
4
5
6
7
8
9
10
11
12
13
14
15
16
17
18
19
20
21
22
23
24
25
26
27
28
29
provider "aws" {
  region = "ap-northeast-2"
  profile = "ljyoon"
}

resource "aws_instance" "example" {
  ami           = "ami-0c76973fbe0ee100c"
  instance_type = "t2.micro"
  tags = {
    Name = "t101-week3"
  }
}

terraform {
  backend "s3" {
    profile = "ljyoon"
    bucket = "jjikin-t101study-tfstate-week3"
    key    = "workspaces-default/terraform.tfstate"
    region = "ap-northeast-2"
    dynamodb_table = "terraform-locks-week3"
  }
}

# 배포
terraform init -force-copy && terraform plan && terraform apply -auto-approve

# 현재 작업 공간 확인
terraform workspace show
	default
새로운 Worksapce 생성
1
2
3
4
5
6
7
8
9
10
11
12
13
14
15
16
17
18
19
20
21
22
23
24
25
26
27
28
terraform workspace new mywork1

terraform plan
# 모든 리소스를 신규로 생성한다고 출력됨
...
     + volume_size           = (known after apply)
     + volume_type           = (known after apply)
   }
}
Plan: 1 to add, 0 to change, 0 to destroy.

terraform apply -auto-approve

terraform workspace new mywork2 && terraform apply -auto-approve

# 생성한 작업 공간 리스트 확인
terraform workspace list
  default
  mywork1
* mywork2

# 작업 공간 전환
terraform workspace select mywork1
	Switched to workspace "mywork1".

# 현재 작업 공간 확인
terraform workspace show
	mywork1
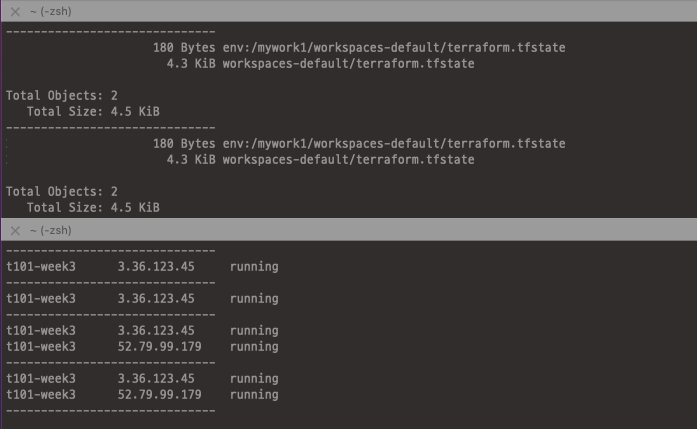
![mywork1 생성 후 결과]() mywork1 생성 후 결과
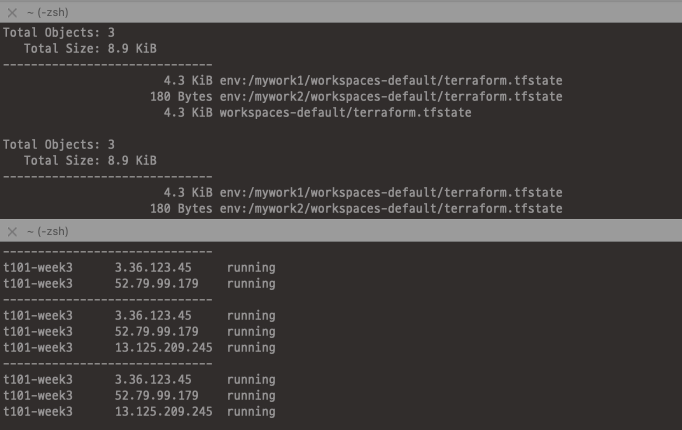
mywork1 생성 후 결과![mywork2 생성 후 결과]() mywork2 생성 후 결과
mywork2 생성 후 결과리소스 삭제
1
2
3
4
5
6
7
8
9
10
11
12
13
14
15
16
17
18
19
20
21
22
23
24
25
26
27
28
29
30
31
terraform workspace select default
terraform destroy -auto-approve
terraform workspace select mywork1
terraform destroy -auto-approve
terraform workspace select mywork2
terraform destroy -auto-approve

# S3 버킷에 객체 삭제
aws s3 rm s3://jjikin-t101study-tfstate-week3 --recursive --profile ljyoon

# S3 버킷에 버저닝 객체 삭제
aws s3api delete-objects \
		--profile ljyoon \
    --bucket jjikin-t101study-tfstate-week3 \
    --delete "$(aws s3api list-object-versions \
    --bucket "jjikin-t101study-tfstate-week3" \
    --output=json --profile "ljyoon" \
    --query='{Objects: Versions[].{Key:Key,VersionId:VersionId}}')"


# S3 버킷에 삭제마커 삭제
aws s3api delete-objects --bucket jjikin-t101study-tfstate-week3 \
    --profile ljyoon \
    --delete "$(aws s3api list-object-versions --bucket "jjikin-t101study-tfstate-week3" \
    --profile ljyoon \
    --query='{Objects: DeleteMarkers[].{Key:Key,VersionId:VersionId}}')"

# 백엔드 리소스 삭제
tfstate-backend$ terraform destroy -auto-approve

# 관련 디렉터리/파일 삭제
Workspace 단점
- 각 작업 공간의 상태 파일이 동일한 backend에 저장되므로 동일한 인증과 접근 통제를 사용합니다.
- 검증과 운영 환경이 다른 backend를 사용하거나, backend 별 보안 수준의 통제 설정이 불가능함
- 기본적으로 코드나 터미널에서 현재 작업 공간에 대한 정보가 표시 되지 않습니다.
- 별도의 툴을 설치하지 않으면 매번
terraform workspace명령어로 확인해야하므로 유지 관리가 어려움 - 원하지 않는 작업 공간에서 명령을 실행할 가능성이 있음(terraform destroy …)
- 별도의 툴을 설치하지 않으면 매번
파일 레이아웃(File layout)을 통한 격리 👍
파일 레이아웃을 통한 격리 방법에는 정답이 없으며 상황에 맞게 적절히 레이아웃을 구성하는 것이 중요합니다. 일반적으로는 테라폼 코드를 환경별, 서비스별로 분리된 폴더에 저장하고 환경별로 서로 다른 backend를 구성합니다.
이러한 방법은 코드를 쉽게 탐색하고 전체적인 구성 요소를 한 번에 파악하기 쉬우며 격리를 통해 에러로 인한 영향도를 줄일 수 있습니다.
레이아웃 구성
아래와 같이 2주차 웹 서버 클러스터 코드와 3주차 backend 코드를 재활용하여 레이아웃을 구성했습니다.
1
2
3
4
5
6
7
8
9
10
11
12
13
14
15
16
17
18
19
20
21
22
23
24
25
26
27
28
29
30
31
32
33
. tfstate-filelayout
├── global
│   └── s3
│       ├── main.tf
│       └── outputs.tf
├── prod
│   ├── db
│   │   └── mysql
│   │       ├── main.tf
│   │       ├── outputs.tf
│   │       └── variables.tf
│   ├── services
│   │   └── webserver-cluster
│   │       ├── main.tf
│   │       ├── outputs.tf
│   │       └── variables.tf
│   └── vpc
│       ├── main.tf
│       └── outputs.tf
└── stage
    ├── db
    │   └── mysql
    │       ├── main.tf
    │       ├── outputs.tf
    │       └── variables.tf
    ├── services
    │   └── webserver-cluster
    │       ├── main.tf
    │       ├── outputs.tf
    │       └── variables.tf
    └── vpc
    		├── main.tf
        └── outputs.tf
리소스 구성(1) (VPC, RDS, S3)
S3 bucket, DynamoDB 구성 및 배포
코드 접기/펼치기
1
2
3
4
5
6
7
8
9
10
11
12
13
14
15
16
17
18
19
20
21
22
23
24
25
26
27
28
29
30
31
32
33
34
35
36
37
38
39
40
41
42
43
44
45
46
# global/s3/main.tf
provider "aws" {
  region = "ap-northeast-2"
  profile = "ljyoon"
}

resource "aws_s3_bucket" "jjikin-tfstate-s3" {
  bucket = "jjikin-tfstate-s3"
}

resource "aws_s3_bucket_versioning" "jjikin-tfstate-s3_versioning" {
  bucket = aws_s3_bucket.jjikin-tfstate-s3.id
  versioning_configuration {
    status = "Enabled"
  }
}

resource "aws_dynamodb_table" "tfstate-db-table" {
  name         = "tfstate-db-table"
  billing_mode = "PAY_PER_REQUEST"
  hash_key     = "LockID"

  attribute {
    name = "LockID"
    type = "S"
  }
}

# global/s3/outputs.tf
output "s3_bucket_arn" {
  value       = aws_s3_bucket.jjikin-tfstate-s3.arn
  description = "The ARN of the S3 bucket"
}

output "dynamodb_table_name" {
  value       = aws_dynamodb_table.tfstate-db-table.name
  description = "The name of the DynamoDB table"
}

# 배포 및 확인
terraform init && terraform plan
terraform apply -auto-approve
terraform state list
	aws_dynamodb_table.tfstate-db-table
	aws_s3_bucket.jjikin-tfstate-s3
	aws_s3_bucket_versioning.jjikin-tfstate-s3_versioning
VPC, Backend, SecurityGroup 구성 및 배포
코드 접기/펼치기
1
2
3
4
5
6
7
8
9
10
11
12
13
14
15
16
17
18
19
20
21
22
23
24
25
26
27
28
29
30
31
32
33
34
35
36
37
38
39
40
41
42
43
44
45
46
47
48
49
50
51
52
53
54
55
56
57
58
59
60
61
62
63
64
65
66
67
68
69
70
71
72
73
74
75
76
77
78
79
80
81
82
83
84
85
86
87
88
89
90
91
92
93
94
95
96
97
98
99
100
101
102
# stage/vpc/main.tf
terraform {
  backend "s3" {
    profile = "ljyoon"
    bucket = "jjikin-tfstate-s3"
    key    = "stage/vpc/terraform.tfstate"
    region = "ap-northeast-2"
    dynamodb_table = "tfstate-db-table"
  }
}

provider "aws" {
  region  = "ap-northeast-2"
  profile = "ljyoon"
}

resource "aws_vpc" "jjikin-vpc" {
  cidr_block       = "10.10.0.0/16"
  enable_dns_hostnames = true

  tags = {
    Name = "jjikin-vpc"
  }
}

resource "aws_subnet" "pri-a-sn" {
  vpc_id     = aws_vpc.jjikin-vpc.id
  cidr_block = "10.10.3.0/24"

  availability_zone = "ap-northeast-2a"

  tags = {
    Name = "pri-a-sn"
  }
}

resource "aws_subnet" "pri-c-sn" {
  vpc_id     = aws_vpc.jjikin-vpc.id
  cidr_block = "10.10.4.0/24"

  availability_zone = "ap-northeast-2c"

  tags = {
    Name = "pri-c-sn"
  }
}

resource "aws_route_table" "pri-rt" {
  vpc_id = aws_vpc.jjikin-vpc.id

  tags = {
    Name = "pri-rt"
  }
}

resource "aws_route_table_association" "pri-rt-a-asso" {
  subnet_id      = aws_subnet.pri-a-sn.id
  route_table_id = aws_route_table.pri-rt.id
}

resource "aws_route_table_association" "pri-rt-c-asso" {
  subnet_id      = aws_subnet.pri-c-sn.id
  route_table_id = aws_route_table.pri-rt.id
}

resource "aws_security_group" "rds-sg" {
  vpc_id      = aws_vpc.jjikin-vpc.id
  name        = "rds-sg"
  description = "rds-sg"
}

resource "aws_security_group_rule" "rds-sg-inbound" {
  type              = "ingress"
  from_port         = 0
  to_port           = 3389
  protocol          = "tcp"
  cidr_blocks       = ["0.0.0.0/0"]
  security_group_id = aws_security_group.rds-sg.id
}

resource "aws_security_group_rule" "rds-sg-outbound" {
  type              = "egress"
  from_port         = 0
  to_port           = 0
  protocol          = "-1"
  cidr_blocks       = ["0.0.0.0/0"]
  security_group_id = aws_security_group.rds-sg.id
}

# 배포 및 확인
terraform init -force-copy && terraform plan
terraform apply -auto-approve
terraform state list
	aws_route_table.pri-rt
	aws_route_table_association.pri-rt-a-asso
	aws_route_table_association.pri-rt-c-asso
	aws_security_group.rds-sg
	aws_security_group_rule.rds-sg-inbound
	aws_security_group_rule.rds-sg-outbound
	aws_subnet.pri-a-sn
	aws_subnet.pri-c-sn
	aws_vpc.jjikin-vpc
RDS 구성 및 배포
코드 접기/펼치기
1
2
3
4
5
6
7
8
9
10
11
12
13
14
15
16
17
18
19
20
21
22
23
24
25
26
27
28
29
30
31
32
33
34
35
36
37
38
39
40
41
42
43
44
45
46
47
48
49
50
51
52
53
54
55
56
57
58
59
60
61
62
63
64
65
66
67
68
69
70
71
72
73
# stage/db/mysql/main.tf
terraform {
  backend "s3" {
    profile = "ljyoon"
    bucket = "jjikin-tfstate-s3"
    key    = "stage/db/mysql/terraform.tfstate"
    region = "ap-northeast-2"
    dynamodb_table = "tfstate-db-table"
  }
}

resource "aws_db_subnet_group" "db-sn-group" {
  name       = "db-sn-group"
  subnet_ids = [aws_subnet.pri-a-sn.id, aws_subnet.pri-c-sn.id]

  tags = {
    Name = "db-sn-group"
  }
}

resource "aws_db_instance" "staging-rds" {
  identifier             = "staging-rds"
  engine                 = "mysql"
  allocated_storage      = 10
  instance_class         = "db.t2.micro"
  db_subnet_group_name   = aws_db_subnet_group.db-sn-group.name
  vpc_security_group_ids = [aws_security_group.rds-sg.id]
  skip_final_snapshot    = true

  db_name                = var.db_name
  username               = var.db_username
  password               = var.db_password
}

# stage/db/outputs.tf
output "address" {
  value       = aws_db_instance.staging-rds.address
  description = "Connect to the database at this endpoint"
}

output "port" {
  value       = aws_db_instance.staging-rds.port
  description = "The port the database is listening on"
}

# stage/db/variables.tf
# REQUIRED
variable "db_username" {
  description = "The username for the database"
  type        = string
  sensitive   = true
}

variable "db_password" {
  description = "The password for the database"
  type        = string
  sensitive   = true
}

# OPTIONAL
variable "db_name" {
  description = "The name to use for the database"
  type        = string
  default     = "tstudydb"
}

# 배포 및 확인
# 접속 정보 설정
export TF_VAR_db_username='cloudneta'
export TF_VAR_db_password='cloudnetaQ!'

terraform init && terraform plan
terraform apply -auto-approve
TroubleShooting과 terraform-remote-state
Error #1 :
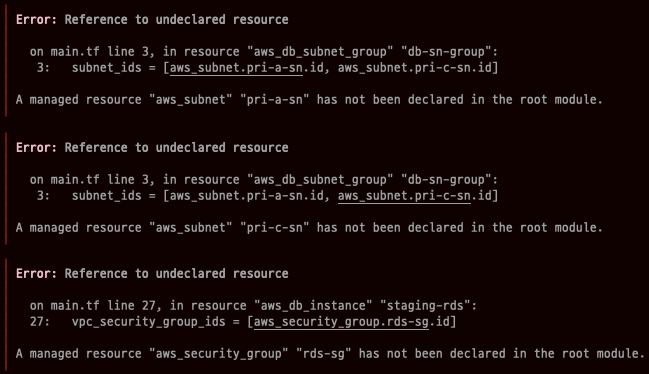
terraform plan시 아래와 같은 에러가 발생합니다.![Untitled]()
두 서브넷과 VPC 기존 ~/vpc/main.tf에서 정의한 리소스지만 ~/db/mysql/main.tf와는 별도의 폴더로 분리되어있는 상태, 즉
.tfstate가 다르기 때문에 참조할 수 없어 발생하는 에러입니다.이를 해결하기 위해서는 Data Source 중 하나인
terraform_remote_state를 사용하여 backend에 저장된 상태 파일 내 output 값을 읽기 전용으로 가져올 수 있습니다.모든 output(출력 변수) 값은 상태 파일에 저장되므로 아래 방법으로 참조가 가능합니다.
data.terraform_remote_state.
<tfstate 이름>.outputs.<출력 변수 이름>서브넷이 정의되어있는 파일(~/stage/vpc/main.tf)이 있는 경로에 output 코드 파일을 추가합니다.
1
2
3
4
5
6
7
8
9
10
11
12
13
14
15
16
17
18
19
20
21
22
23
24
# stage/vpc/output.tf
output "pri-a-sn" {
  value = aws_subnet.pri-a-sn.id
}

output "pri-c-sn" {
  value = aws_subnet.pri-c-sn.id
}

output "rds-sg" {
  value = aws_security_group.rds-sg.id
}

output "vpc-id" {
  value = aws_vpc.jjikin-vpc.id
}

# 리소스 변경이 아닌 output 결과만 변경되므로 refresh로도 반영이 가능합니다.
terraform refresh
  Outputs:
    pri-a-sn = "subnet-00caa026d117ca6e5"
    pri-c-sn = "subnet-008895a476c40dc3b"
    rds-sg = "sg-0a9cd8f852c15b194"
    vpc-id = "vpc-000a12102cd335eb8"
vpc의 상태 파일을 참조하는 코드를 추가합니다.
1 2 3 4 5 6 7 8 9 10 11 12 13 14 15 16 17 18 19 20 21 22 23 24 25 26 27 28 29 30 31 32 33 34 35 36 37 38 39 40 41 42 43 44 45 46 47
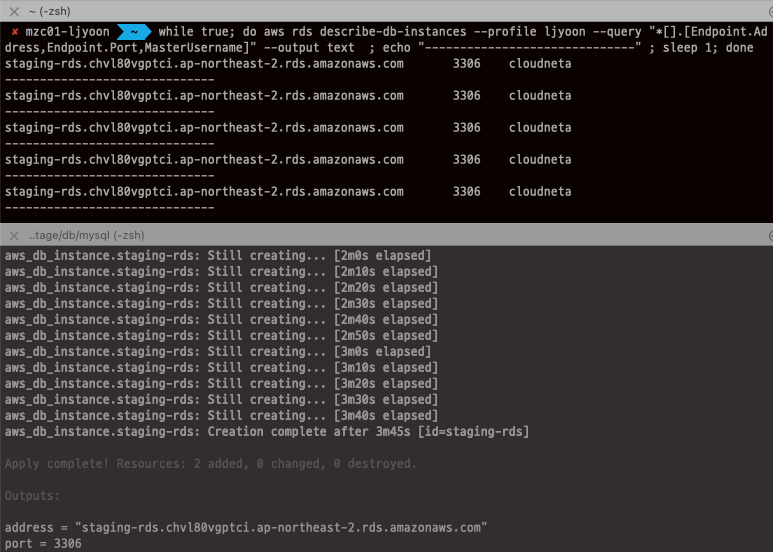
# stage/db/mysql/main.tf terraform { backend "s3" { ... data "terraform_remote_state" "vpc" { backend = "s3" config { profile = "ljyoon" bucket = "jjikin-tfstate-s3" key = "stage/vpc/terraform.tfstate" region = "ap-northeast-2" #encrypt = true } } resource "aws_db_subnet_group" "db-sn-group" { name = "db-sn-group" subnet_ids = [data.terraform_remote_state.vpc.outputs.pri-a-sn, data.terraform_remote_state.vpc.outputs.pri-c-sn] tags = { Name = "db-sn-group" } } resource "aws_db_instance" "staging-rds" { identifier = "staging-rds" engine = "mysql" allocated_storage = 10 instance_class = "db.t2.micro" db_subnet_group_name = aws_db_subnet_group.db-sn-group.name vpc_security_group_ids = [data.terraform_remote_state.vpc.outputs.rds-sg] skip_final_snapshot = true db_name = var.db_name username = var.db_username password = var.db_password } # 배포 terraform plan terraform apply -auto-approve ... Outputs: address = "staging-rds.chvl80vgptci.ap-northeast-2.rds.amazonaws.com" port = 3306
정상적으로 vpc 리소스들을 참조하여 RDS가 생성되었습니다.
![Untitled]()
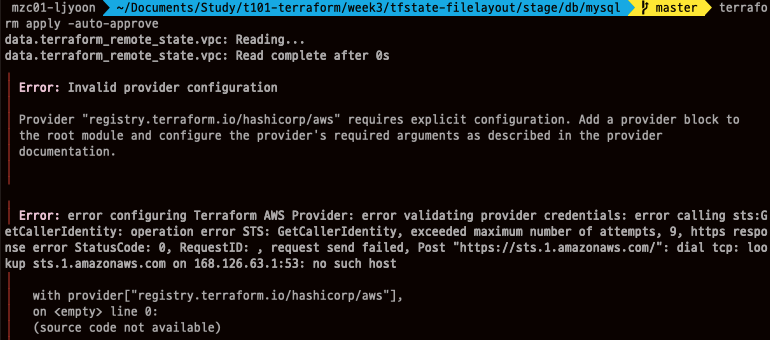
Error #2 : AWS profile을 이용하여 S3 Backend 접근 시 STS Token 관련 에러가 발생했습니다.
![Untitled]()
아래와 같이 프로파일을 추가했음에도 기본 자격 증명을 사용하여 접근을 시도합니다.
1
2
3
4
5
6
7
8
9
10
data "terraform_remote_state" "vpc" {
  backend = "s3"
  config {
    profile = "ljyoon"
    bucket = "jjikin-tfstate-s3"
    key    = "stage/vpc/terraform.tfstate"
    region = "ap-northeast-2"
    #encrypt = true
  }
}
업무 특성 상 여러 고객사 어카운트에 CLI로 접근해야 하는 경우가 있기 때문에, 휴먼 에러 방지를 위해 기본 자격 증명은 사용하지 않고 있습니다. 구글링 시 동일한 문제를 겪고있는 이슈를 찾았지만 해결 방법이 아직 없는 것으로 확인했습니다.
기본 자격 증명 설정 후 정상적으로 S3 Backend에 접근가능 했습니다.
리소스 구성(2) (Instance, ASG, ALB)
웹 서버 클러스터 구성 및 배포
코드 접기/펼치기
1
2
3
4
5
6
7
8
9
10
11
12
13
14
15
16
17
18
19
20
21
22
23
24
25
26
27
28
29
30
31
32
33
34
35
36
37
38
39
40
41
42
43
44
45
46
47
48
49
50
51
52
53
54
55
56
57
58
59
60
61
62
63
64
65
66
67
68
69
70
71
72
73
74
75
76
77
78
79
80
81
82
83
84
85
86
87
88
89
90
91
92
93
94
95
96
97
98
99
100
101
102
103
104
105
106
107
108
109
110
111
112
113
114
115
116
117
118
119
120
121
122
123
124
125
126
127
128
129
130
131
132
# stage/services/webserver-cluster/main.tf
terraform {
  backend "s3" {
    profile = "ljyoon"
    bucket = "jjikin-tfstate-s3"
    key    = "stage/services/webserver-cluster/terraform.tfstate"
    region = "ap-northeast-2"
    dynamodb_table = "tfstate-db-table"
  }
}

provider "aws" {
  region  = "ap-northeast-2"
  profile = "ljyoon"
}

# vpc tfstate 파일 참조
data "terraform_remote_state" "vpc" {
  backend = "s3"
  config = {
    profile = "ljyoon"
    bucket = "jjikin-tfstate-s3"
    key    = "stage/vpc/terraform.tfstate"
    region = "ap-northeast-2"
  }
}

# db tfstate 파일 참조
data "terraform_remote_state" "db" {
  backend = "s3"
  config = {
    profile = "ljyoon"
    bucket = "jjikin-tfstate-s3"
    key    = "stage/db/mysql/terraform.tfstate"
    region = "ap-northeast-2"
  }
}

resource "aws_subnet" "pub-a-sn" {
  vpc_id     = data.terraform_remote_state.vpc.outputs.vpc-id
  cidr_block = "10.10.1.0/24"

  availability_zone = "ap-northeast-2a"

  tags = {
    Name = "pub-a-sn"
  }
}

resource "aws_subnet" "pub-c-sn" {
  vpc_id     = data.terraform_remote_state.vpc.outputs.vpc-id
  cidr_block = "10.10.2.0/24"

  availability_zone = "ap-northeast-2c"

  tags = {
    Name = "pub-c-sn"
  }
}

resource "aws_internet_gateway" "jjikin-igw" {
  vpc_id = data.terraform_remote_state.vpc.outputs.vpc-id

  tags = {
    Name = "jjikin-igw"
  }
}

resource "aws_route_table" "pub-rt" {
  vpc_id = data.terraform_remote_state.vpc.outputs.vpc-id

  tags = {
    Name = "pub-rt"
  }
}

resource "aws_route_table_association" "pub-rt-a-asso" {
  subnet_id      = aws_subnet.pub-a-sn.id
  route_table_id = aws_route_table.pub-rt.id
}

resource "aws_route_table_association" "pub-rt-c-asso" {
  subnet_id      = aws_subnet.pub-c-sn.id
  route_table_id = aws_route_table.pub-rt.id
}

resource "aws_route" "default-route" {
  route_table_id         = aws_route_table.pub-rt.id
  destination_cidr_block = "0.0.0.0/0"
  gateway_id             = aws_internet_gateway.jjikin-igw.id
}

resource "aws_security_group" "web-sg" {
  vpc_id      = data.terraform_remote_state.vpc.outputs.vpc-id
  name        = "web-sg"
  description = "web-sg"
}

resource "aws_security_group_rule" "web-sg-inbound" {
  type              = "ingress"
  from_port         = 8080
  to_port           = 8080
  protocol          = "tcp"
  cidr_blocks       = ["0.0.0.0/0"]
  security_group_id = aws_security_group.web-sg.id
}

resource "aws_security_group_rule" "web-sg-outbound" {
  type              = "egress"
  from_port         = 0
  to_port           = 0
  protocol          = "-1"
  cidr_blocks       = ["0.0.0.0/0"]
  security_group_id = aws_security_group.web-sg.id
}

# 배포 및 확인
terraform init -force-copy && terraform plan
terraform apply -auto-approve
terraform state list
	data.terraform_remote_state.db
	data.terraform_remote_state.vpc
	aws_internet_gateway.jjikin-igw
	aws_route.default-route
	aws_route_table.pub-rt
	aws_route_table_association.pub-rt-a-asso
	aws_route_table_association.pub-rt-c-asso
	aws_security_group.web-sg
	aws_security_group_rule.web-sg-inbound
	aws_security_group_rule.web-sg-outbound
	aws_subnet.pub-a-sn
	aws_subnet.pub-c-sn
ASG 구성, ALB 연결 및 배포
코드 접기/펼치기
1
2
3
4
5
6
7
8
9
10
11
12
13
14
15
16
17
18
19
20
21
22
23
24
25
26
27
28
29
30
31
32
33
34
35
36
37
38
39
40
41
42
43
44
45
46
47
48
49
50
51
52
53
54
55
56
57
58
59
60
61
62
63
64
65
66
67
68
69
70
71
72
73
74
75
76
77
78
79
80
81
82
83
84
85
86
# Instance user data 생성
cat <<EOT > user-data.sh
#!/bin/bash
wget https://busybox.net/downloads/binaries/1.31.0-defconfig-multiarch-musl/busybox-x86_64
mv busybox-x86_64 busybox
chmod +x busybox

cat > index.html <<EOF
<h1>T101 Study</h1>
<p>My RDS DB address: \${db_address}</p>
<p>My RDS DB port: \${db_port}</p>
EOF
nohup ./busybox httpd -f -p \${server_port} &
EOT

# stage/services/webserver-cluster/main.tf

# terrform 내장함수 - template_file
data "template_file" "user_data" {
  template = file("user-data.sh")

  vars = {
    server_port = 8080
    db_address  = data.terraform_remote_state.db.outputs.address
    db_port     = data.terraform_remote_state.db.outputs.port
  }
}

data "aws_ami" "amazonlinux2" {
  most_recent = true
  filter {
    name   = "owner-alias"
    values = ["amazon"]
  }

  filter {
    name   = "name"
    values = ["amzn2-ami-hvm-*-x86_64-gp2"]
  }

  owners = ["amazon"]
}

resource "aws_launch_template" "webserver-template" {
  name            = "webserver-template"
  image_id        = data.aws_ami.amazonlinux2.id
  instance_type   = "t2.micro"
  network_interfaces {
		associate_public_ip_address = true
    security_groups = [aws_security_group.web-sg.id]
  }

	# Render the User Data script as a template
  user_data = base64encode(templatefile("user-data.sh", {
    server_port = 8080
    db_address  = data.terraform_remote_state.db.outputs.address
    db_port     = data.terraform_remote_state.db.outputs.port
  }))
}

resource "aws_autoscaling_group" "webserver-asg" {
  name                 = "webserver-asg"
  vpc_zone_identifier  = [aws_subnet.pub-a-sn.id, aws_subnet.pub-c-sn.id]
  desired_capacity = 2
  min_size = 2
  max_size = 10

  # ALB 연결
  target_group_arns = [aws_lb_target_group.web-alb-tg.arn]
  health_check_type = "ELB"

  launch_template {
    id      = aws_launch_template.webserver-template.id
    version = "$Latest"
  }

  tag {
    key                 = "Name"
    value               = "webserver-asg"
    propagate_at_launch = true
  }
}

# 배포
terraform plan
terraform apply -auto-approve
ALB 구성 및 배포
코드 접기/펼치기
1
2
3
4
5
6
7
8
9
10
11
12
13
14
15
16
17
18
19
20
21
22
23
24
25
26
27
28
29
30
31
32
33
34
35
36
37
38
39
40
41
42
43
44
45
46
47
48
49
50
51
52
53
54
55
56
57
58
59
60
61
62
63
64
65
66
67
68
69
70
71
72
73
# 기본사항 정의
resource "aws_lb" "web-alb" {
  name               = "web-alb"
  load_balancer_type = "application"
  subnets            = [aws_subnet.pub-a-sn.id, aws_subnet.pub-a-sn.id]
  security_groups = [aws_security_group.web-sg.id]

  tags = {
    Name = "web-alb"
  }
}

# 리스너 정의
resource "aws_lb_listener" "web-http" {
  load_balancer_arn = aws_lb.web-alb.arn
  port              = 8080
  protocol          = "HTTP"

  # By default, return a simple 404 page
  default_action {
    type = "fixed-response"

    fixed_response {
      content_type = "text/plain"
      message_body = "404: page not found - T101 Study"
      status_code  = 404
    }
  }
}

# 타겟그룹 정의
resource "aws_lb_target_group" "web-alb-tg" {
  name = "web-alb-tg"
  port     = 8080
  protocol = "HTTP"
  vpc_id   = data.terraform_remote_state.vpc.outputs.vpc-id

  health_check {
    path                = "/"
    protocol            = "HTTP"
    matcher             = "200-299"
    interval            = 5
    timeout             = 3
    healthy_threshold   = 2
    unhealthy_threshold = 2
  }
}

# 리스너 규칙 정의
resource "aws_lb_listener_rule" "web-alb-rule" {
  listener_arn = aws_lb_listener.web-http.arn
  priority     = 100

  condition {
    path_pattern {
      values = ["*"]
    }
  }

  action {
    type             = "forward"
    target_group_arn = aws_lb_target_group.web-alb-tg.arn
  }
}

output "web-alb_dns" {
  value       = aws_lb.web-alb.dns_name
  description = "The DNS Address of the ALB"
}

# 배포 및 확인
terraform plan
terraform apply -auto-approve
테스트 및 결론
1
2
3
ALBDNS=$(terraform output -raw web-alb_dns)
while true; do curl --connect-timeout 1  http://$ALBDNS:8080 ; echo; echo "------------------------------"; sleep 1; done
curl -s http://$ALBDNS:8080
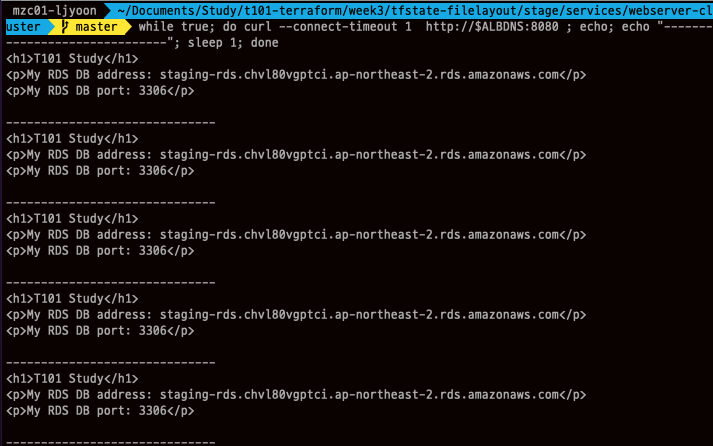
서비스별로 backend를 생성해보고 RDS의 엔드포인트 주소와 포트를 terraform_remote_state를 사용해 DB data source에서 가져온 후, 변수로서 웹 서버의 유저 데이터에 적용하여 출력해보는 실습이었습니다.
리소스 삭제
1
2
3
4
5
6
7
8
9
10
11
12
13
14
15
16
17
18
19
20
21
22
23
24
25
26
# 각 폴더에서 리소스 삭제
stage/services/webserver-cluster$ terraform destroy -auto-approve
stage/db/mysql$ terraform destroy -auto-approve
stage/vpc$ terraform destroy -auto-approve

# S3 버킷에 객체 삭제
aws s3 rm s3://jjikin-tfstate-s3 --recursive --profile ljyoon

# S3 버킷에 버저닝 객체 삭제
aws s3api delete-objects \
		--profile ljyoon \
    --bucket jjikin-tfstate-s3 \
    --delete "$(aws s3api list-object-versions \
    --bucket "jjikin-tfstate-s3" \
    --output=json --profile "ljyoon" \
    --query='{Objects: Versions[].{Key:Key,VersionId:VersionId}}')"

# S3 버킷에 삭제마커 삭제
aws s3api delete-objects --bucket jjikin-tfstate-s3 \
    --profile ljyoon \
    --delete "$(aws s3api list-object-versions --bucket "jjikin-tfstate-s3" \
    --profile ljyoon \
    --query='{Objects: DeleteMarkers[].{Key:Key,VersionId:VersionId}}')"

# 백엔드 리소스 삭제
global/s3$ terraform destroy -auto-approve
참고
- 테라폼 상태를 격리하지 않는다면
- terraform_remote_state 사용 방법
- Terraform Docsㅣ Resource: aws_db_instance
- Terraform DocsㅣResource: aws_secretmanager_secret
- Terraform DocsㅣFunction: base64encode
- S3 Backend를 profile을 이용하여 접근할 때 정상적으로 자격증명이 동작하지 않는 문제
- 가시다님 스터디 자료