default VPC에 Instance 배포하기
배포 전 준비
Amazon Linux 최신 AMI 확인하기
최신 AMI ID는 예고없이 변경될 수 있으므로 AWS System Manager 서비스에서 제공하는 공개용 Parameter Store에서 최신 AMI ID를 조회합니다.
1
2
3
4
5
6
7
8
9
aws ssm get-parameters-by-path --profile ljyoon --path /aws/service/ami-amazon-linux-latest --query "Parameters[].Name"

# 실행 결과
[
...
  "/aws/service/ami-amazon-linux-latest/amzn2-ami-hvm-x86_64-ebs",
  "/aws/service/ami-amazon-linux-latest/amzn2-ami-hvm-x86_64-gp2",
...
]
AMI에 연결되는 루트 볼륨 타입에 따라 여러 AMI가 확인되는데, 차이는 다음과 같습니다.
- amzn2-ami-hvm-x86_64-ebs : 마그네틱(표준) 권장
- amzn2-ami-hvm-x86_64-gp2 : 범용 SSD 권장
특이한 점은 필수가 아니라 권장 사항이라는 점입니다.
다시말해 ebs가 네이밍된 AMI에 gp2 타입의 루트 볼륨을 사용할 수 있고 반대의 경우도 가능하지만, 각 타입별 최적화 설정이 적용되있을 가능성이 크므로 권장 사항에 맞게 사용하는 것이 좋을 듯 합니다.
1
2
3
4
aws ssm get-parameters --profile ljyoon --names /aws/service/ami-amazon-linux-latest/amzn2-ami-hvm-x86_64-gp2 --query "Parameters[0].[Value]"

# 실행 결과
ami-0bb19571ca7f4bf31
EC2 Instance 생성 모니터링
생성 과정 및 결과를 확인하기 위해 인스턴스 정보를 반복해서 호출합니다.
1
2
export AWS_PAGER=""
while true; do aws ec2 describe-instances --profile ljyoon --query "Reservations[*].Instances[*].{PublicIPAdd:PublicIpAddress,InstanceName:Tags[?Key=='Name']|[0].Value,Status:State.Name}" --filters Name=instance-state-name,Values=running --output text ; echo "------------------------------" ; sleep 1; done
배포
코드 파일(HCL) 작성 아직 배우진 않았으나 Terraform 코드에서 항상 최신의 AmazonLinux2 AMI ID를 가져올 수 있도록 설정하기 위해 Data 키워드를 사용했습니다. Data Sources를 사용하면 provider와 같은 테라폼 외부 또는 다른 Terraform 구성에 의해 정의된 정보를 가져올 수 있습니다.
1
2
3
4
5
6
7
8
9
10
11
12
13
14
cat <<EOT > main.tf
data "aws_ssm_parameter" "amzn2_latest"  {
  name = "/aws/service/ami-amazon-linux-latest/amzn2-ami-hvm-x86_64-gp2"
}

provider "aws" {
  profile = "ljyoon"
  region = "ap-northeast-2"
}

resource "aws_instance" "example" {
  ami           = data.aws_ssm_parameter.amzn2_latest.value
  instance_type = "t2.micro"
}
배포 실행
1 2 3 4 5 6 7 8 9 10 11 12 13 14 15 16 17 18 19 20 21 22 23 24 25 26 27 28 29 30 31 32 33 34 35 36 37 38 39 40 41
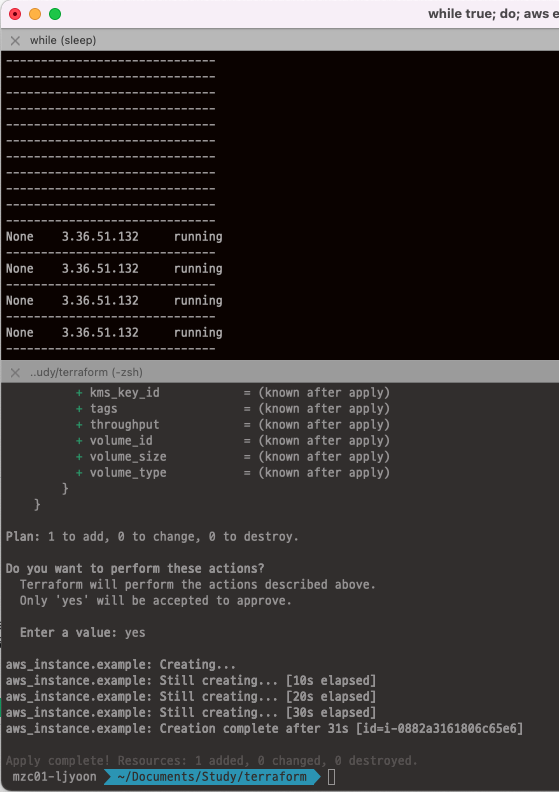
# init : provider에 맞는 플러그인, 라이브러리 파일들을 가져온 후 # Terraform 구성 파일이 포함된 작업 디렉토리를 초기화합니다. terraform init ls -al main.tf .terraform .terraform.lock.hcl # tree .terraform을 통해 생성된 리소스 확인 .terraform └── providers └── registry.terraform.io └── hashicorp └── aws └── 4.34.0 └── darwin_amd64 └── terraform-provider-aws_v4.34.0_x5 # plan terraform plan # apply terraform apply # 배포 결과 Plan: 1 to add, 0 to change, 0 to destroy. Do you want to perform these actions? Terraform will perform the actions described above. Only 'yes' will be accepted to approve. Enter a value: yes ... aws_instance.example: Creating... aws_instance.example: Still creating... [10s elapsed] aws_instance.example: Still creating... [20s elapsed] aws_instance.example: Still creating... [30s elapsed] aws_instance.example: Creation complete after 31s [id=i-0882a3161806c65e6] Apply complete! Resources: 1 added, 0 changed, 0 destroyed.
배포 결과
![Untitled]()
EC2 태그 정보 수정
코드 파일(HCL) 수정
1
2
3
4
5
6
7
8
9
10
11
12
13
14
15
16
17
cat <<EOT > main.tf
data "aws_ssm_parameter" "amzn2_latest"  {
  name = "/aws/service/ami-amazon-linux-latest/amzn2-ami-hvm-x86_64-gp2"
}

provider "aws" {
  profile = "ljyoon"
  region = "ap-northeast-2"
}

resource "aws_instance" "example" {
  ami           = data.aws_ssm_parameter.amzn2_latest.value
  instance_type = "t2.micro"
  **tags = {
    Name = "t101-study"
  }**
}
배포 실행
1
2
3
4
5
6
7
8
9
10
11
12
13
14
15
16
17
18
19
20
21
22
23
24
25
26
27
28
29
30
31
32
33
34
35
terraform plan
# 실행 결과
  ...
	Terraform will perform the following actions:

	  # aws_instance.example will be updated in-place
	  ~ resource "aws_instance" "example" {
	        id                                   = "i-039fb477a5947fb9f"
	      ~ tags                                 = {
	          + "Name" = "t101-study"
	        }
	      ~ tags_all                             = {
	          + "Name" = "t101-study"
	        }
	        # (34 unchanged attributes hidden)

	        # (7 unchanged blocks hidden)
	    }

	Plan: 0 to add, 1 to change, 0 to destroy.

terraform apply
# 배포 결과
	Plan: 0 to add, 1 to change, 0 to destroy.

	Do you want to perform these actions?
	  Terraform will perform the actions described above.
	  Only 'yes' will be accepted to approve.

	  Enter a value: yes

	aws_instance.example: Modifying... [id=i-039fb477a5947fb9f]
	aws_instance.example: Modifications complete after 1s [id=i-039fb477a5947fb9f]

	Apply complete! Resources: 0 added, 1 changed, 0 destroyed.
배포 결과
![Untitled]()

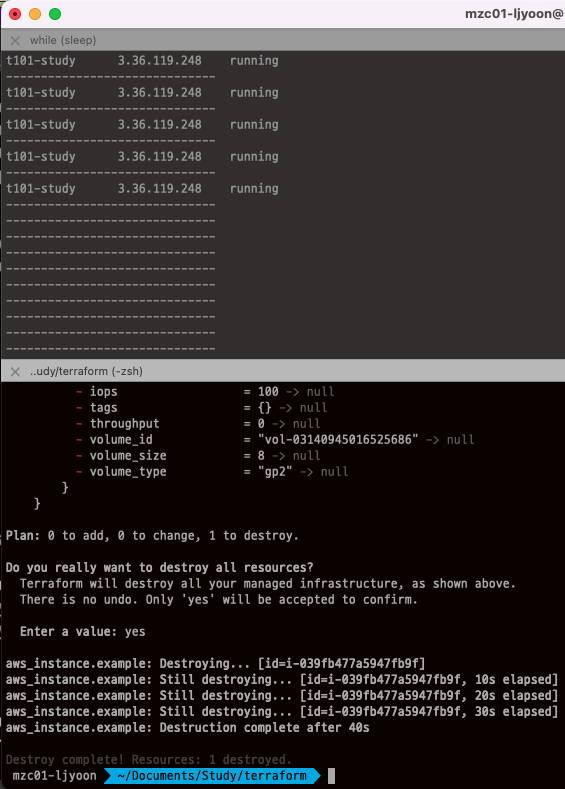
Instance 삭제
배포 실행
1
2
3
4
5
# 리소스 삭제
terraform destroy
 Enter a value: yes 입력

terraform init
배포 결과
![Untitled]()
default VPC에 웹 서버가 구성된 Instance 배포하기
배포
코드파일(HCL) 작성
1 2 3 4 5 6 7 8 9 10 11 12 13 14 15 16 17 18 19 20 21 22 23 24 25 26 27 28 29 30 31 32 33 34 35 36
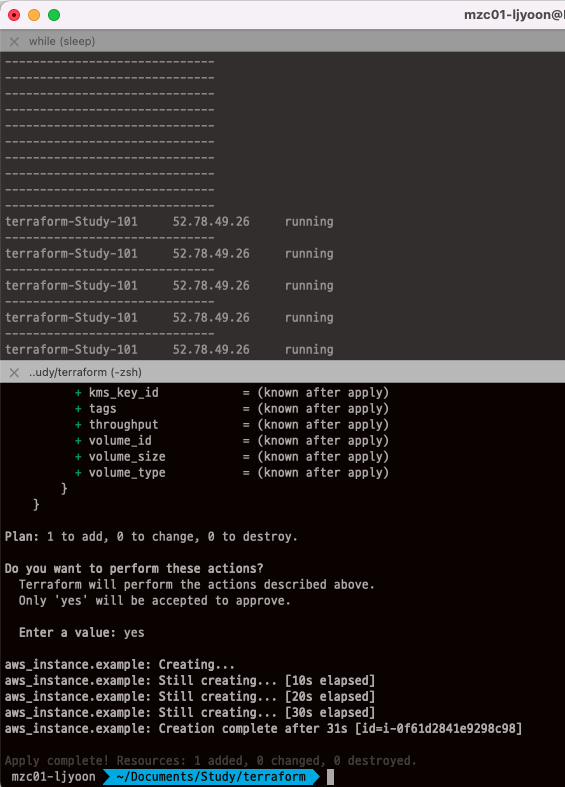
cat <<EOT > main.tf data "aws_ami" "ubuntu" { most_recent = true filter { name = "name" values = ["ubuntu/images/hvm-ssd/ubuntu-*-*-amd64-server-*"] } filter { name = "virtualization-type" values = ["hvm"] } owners = ["099720109477"] # ubuntu 관련 공식 AWS Account ID } provider "aws" { profile = "ljyoon" region = "ap-northeast-2" } resource "aws_instance" "example" { ami = data.aws_ami.ubuntu.id instance_type = "t2.micro" user_data = <<-EOF #!/bin/bash echo "Hello, T101 Study" > index.html nohup busybox httpd -f -p 8080 & EOF tags = { Name = "terraform-Study-101" } } EOT
배포 실행
1
2
3
4
5
6
7
8
9
10
terraform plan
# 실행 결과
	...
	+ tenancy                              = (known after apply)
	+ user_data                            = "d91ca31904077f0b641b5dd5a783401396ffbf3f"
	+ user_data_base64                     = (known after apply)
	...
	Plan: 1 to add, 0 to change, 0 to destroy.

terraform apply
배포 결과
![Untitled]()
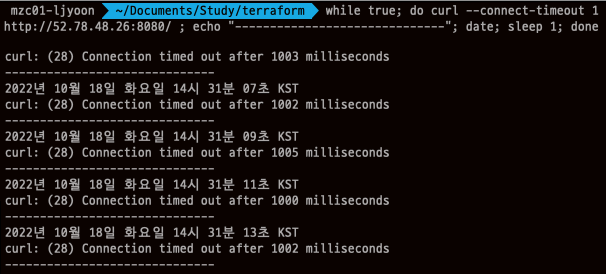
접속 테스트 및 문제 해결
웹 서버 접속 테스트
![Untitled]()
인스턴스 내부에서는 8080 포트로 Listen 하고 있으나 외부에서 접근 가능하도록 설정하지 않았으므로 보안그룹 인바운드를 허용하는 규칙이 필요합니다.
보안그룹을 생성하는 코드를 추가합니다.
1
2
3
4
5
6
7
8
9
10
11
12
13
14
15
16
17
18
19
20
21
resource "aws_security_group" "webserver" {
  name = var.security_group_name

  ingress {
    from_port   = 8080
    to_port     = 8080
    protocol    = "tcp"
    cidr_blocks = ["0.0.0.0/0"]
  }
}

variable "security_group_name" {
  description = "The security group name of webserver"
  type        = string
  default     = "terraform-example-webserver"
}

output "public_ip" {
  value       = aws_instance.example.public_ip
  description = "The public IP of the Instance"
}
- variable : 테라폼 코드 내에서 사용할 수 있는 변수를 정의
- output :
terraform apply적용 후 지정한 값들이 출력되고,tfstate파일에도 output 값이 저장되기 때문에 원하는 정보를 개발 환경에서 바로 확인 가능합니다.
보안그룹을 인스턴스에 연결하도록 코드를 추가합니다.
1
2
3
4
5
6
...
resource "aws_instance" "example" {
  ami           = data.aws_ssm_parameter.amzn2_latest.value
  instance_type = "t2.micro"
  **vpc_security_group_ids = [aws_security_group.webserver.id]**
...
- 보안그룹 생성 코드에서 정의한 보안그룹(webserver)의 id를 통해 인스턴스에 연결합니다.
배포 진행
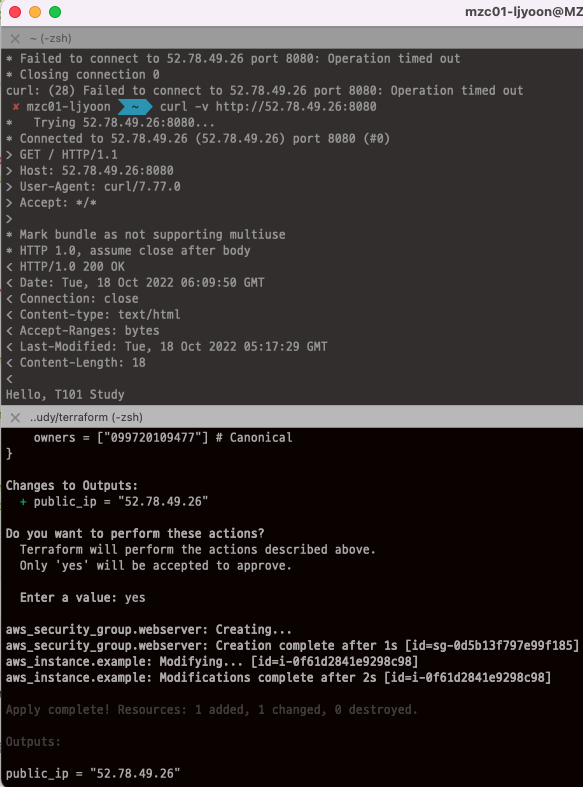
배포 후 테스트하였으나 동일하게 Timeout이 발생했습니다.
- 코드 및 보안그룹 설정에는 문제 없음
- AWS VPC 설정 확인 시 default subnet에 대한 라우팅 테이블과 igw을 생성되어 있지 않음을 확인
- 관련 리소스 생성 및 설정 후 웹 서버 정상 접속 확인
기존 default VPC를 사용하지 않아 관련 리소스를 모두 삭제한 상태에서 default VPC만 재생성해서 발생한 문제였습니다.
![Untitled]()
웹 서버 서비스 포트 변경하기
코드 수정
1
2
3
4
5
6
7
8
9
10
11
12
13
14
15
16
17
18
19
20
21
22
23
24
cat <<EOT > main.tf
...
resource "aws_instance" "example" {
  ami           = data.aws_ssm_parameter.amzn2_latest.value
  instance_type = "t2.micro"
  user_data = <<-EOF
              #!/bin/bash
              echo "Hello, T101 Study 9090" > index.html
              nohup busybox httpd -f -p 9090 &
              EOF

	user_data_replace_on_change = true

resource "aws_security_group" "webserver" {
  name = var.security_group_name

  ingress {
    from_port   = 9090
    to_port     = 9090
    protocol    = "tcp"
    cidr_blocks = ["0.0.0.0/0"]
  }
}
...
- user_data_replace_on_change
- 인스턴스의 유저 데이터는 기본적으로 생성 시에만 설정 가능하므로 코드 내 유저 데이터를 변경 후 배포해도 반영이 되지 않습니다. 해당 옵션을 True로 설정하면 유저 데이터 변경사항이 있는 경우, 인스턴스 교체를 통해 사용자 데이터를 반영하도록 합니다.
배포 진행
1 2 3 4 5 6 7 8 9 10 11 12 13 14 15 16
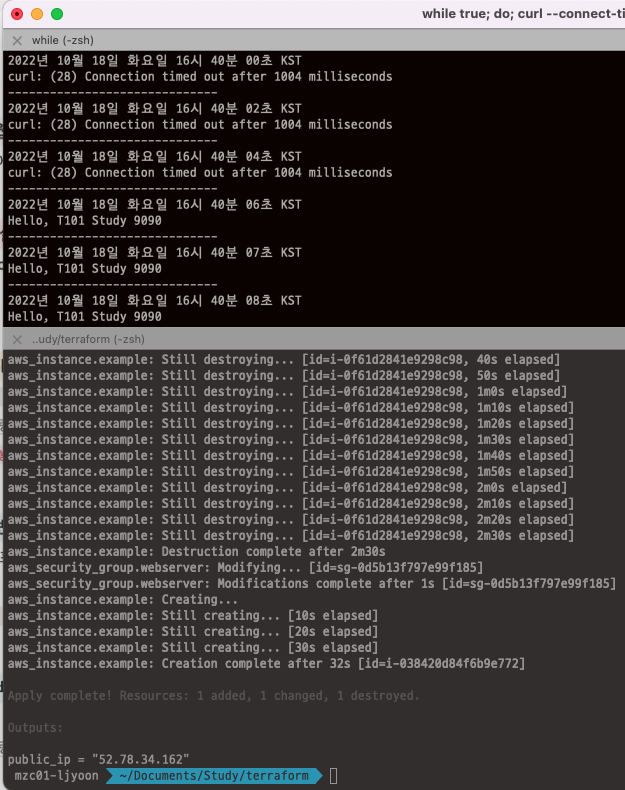
terraform plan # aws_instance.example must be replaced -/+ resource "aws_instance" "example" { ... ~ user_data = "d91ca31904077f0b641b5dd5a783401396ffbf3f" -> "f1a1c16060740d7be18475c067c120a0eed366da" # forces replacement ... Plan: 1 to add, 1 to change, 1 to destroy. Changes to Outputs: ~ public_ip = "52.78.49.26" -> (known after apply) terraform apply # 모니터링 while true; do curl --connect-timeout 1 http://52.78.34.162:9090/ ; echo "------------------------------"; date; sleep 1; done
배포 시 인스턴스가 교체될 것임을 확인할 수 있습니다.
배포 결과
![Untitled]()
Instance 삭제
배포 실행
1
2
3
4
5
# 리소스 삭제
terraform destroy
 Enter a value: yes 입력

terraform init
참고